Custom
Layouts
Introduction
It is quite well documented how to customise Sitefinity's 'content widgets'. But customising the 'layout widgets', well, that's a little less talked about. It's easy to add your own layout widgets but these are static HTML files. Often I see a dozen options created for every scenario and/or instructions about adding speciality classes in the designer to achieve effects. This is not a good experience for the content editor.
Out of the box, we can easily create our own grid layouts by adding files into the GridTemplate folder with our own HTML. When we drag those layouts onto our page we can edit the class names. That's some functionality but not much.
What if we have a dozen classes that our content editor can apply. They have to remember them all and that is not a very impressive solution. You could create a dozen versions but again scrolling through options doesn't look so cool.
What if we want to provide the ability for the user to apply some custom text to an attribute on the elements? What if you want the user to select a background image to be used? You can't do any of this. Actually, I lie, you can and that's what I am going to show you.
I can not take much credit for this work. This was really done by my Sitefinity friends at American Eagle.
Knowledge base
The good news is this has been asked before and a knowledge base article has been written showing you how to do the first scenario of adding a 'title' attribute or any other attribute to a layout designer so that the user can type in their desired value and it will be rendered on the page.
Add a background image
In this post, I am going to extend on that to add an image selector, thus allowing the user to select an image and apply it as a CSS background-image property to the element. With this knowledge, you should be able to extend things further as your requirements may require.
Warning: You will see that you are required to take Sitefinity's code and modify them. I highly recommend that you clearly comment/mark your changes. As releases come out they may make improvements and changes to these files. Whenever you plan an upgrade you should compare your files with the new versions to see if you need to merge both changes to avoid breaking functionality.
Let's go
First create your layout widget under /ResourcePackages/{YourPackage}/GridTemplate/. In my case, I created one called 'container-background.html'. I added my class that defines the background image but without the URL image reference to use. That's what we will inject.
<div class="sf_colsIn grid-container container-background"
     data-sf-element="ContainerBackground"
     data-placeholder-label="Container Background">
</div>
.container-background {
    padding: 2rem 2.5rem;
    box-shadow: 0 0 15px 10px rgba(50, 50, 50, 0.1);
    background: #ffffff;
}
Designer.cshtml
Get a copy of the razor designer and copy it to /ResourcePackages/{YourPackage}/Mvc/Views/GridDesigner/Designer.cshtml.
Around line 32 I have added an 'Image Selector'. This markup should look familiar if you have added an image selector to a custom content widget. You will notice that the selector is only shown if the title of this layout has the word 'background' in it. This is because this layout designer is universal. It applies to every layout widget and I only want the content editor to see this option for layouts designed to add a background image. The other thing to note is the angular variable {{$index}}. This index is for each data-sf-element in your layout. In my case, I am using a single element but in layouts with multiple rows/columns, you will get a selector for each. This may or may not be desirable in your project.
<uib-tab heading="@Html.Resource("Classes")">
    <h3>
        @Html.Resource("Classes")
    </h3>
    <div data-ng-repeat="item in gridElements" class="form-group">
        <div class="section-wrapper">
            <div>
                <label for="prop-{{item.name}}" ng-bind="item.name"></label>
                <input id="prop-{{item.css}}" type="text" class="form-control" ng-model="item.css" />
            </div>
            <br />

            @*Custom image selector*@
            <div class="row" ng-show="'@Model.GridTitle.ToLower().Contains("background").ToString()' == 'True'">
                <div class="col-sm-4">
                    <button id="selector-{{$index}}" class="btn btn-xs btn-default" onclick="showImageSelector(this)"><span id="txt-selector-{{$index}}">Show</span> image selector</button>
                </div>
                <div class="col-sm-8">
                    <label>Background image</label>
                    <br />
                    <img id="tmb-selector-{{$index}}" src="{{item.selectedImage.MediaUrl}}" width="50" height="50" style="max-width:50px;" />
                    <div id="div-selector-{{$index}}" style="display:none;">
                        <sf-image-field sf-model="item.selectedImageId"
                                        sf-image="item.selectedImage"
                                        sf-provider="item.imageProvider"
                                        sf-media-settings="@SettingsHelpers.GetMediaSettings("Image")" />
                    </div>
                </div>
            </div>
            <hr />
        </div>
    </div>
</uib-tab>
At the end of the file, we need to add some extra script references so that the image selector will work.
As I publish this article I recall my tasks to see if all of them are actually needed. But my lazy side kicks in and thinks, "it's the backend. An extra script or two won't hurt".
@*custom - needed for the sf-image-field*@
@Html.Script(Url.WidgetContent("Mvc/Scripts/Angular/angular-resource.min.js"))
@Html.Script(Url.WidgetContent("Mvc/Scripts/sf-bootstrap-popover.js"))
@Html.Script(Url.WidgetContent("Mvc/Scripts/expander.js"))
@Html.Script(Url.WidgetContent("Mvc/Scripts/ng-tags-input.min/ng-tags-input.min.js"))
@Html.Script(Url.WidgetContent("client-components/fields/sf-fields.js"))
@Html.Script(Url.WidgetContent("client-components/selectors/common/sf-services.js"))
@Html.Script(Url.WidgetContent("client-components/selectors/common/sf-selectors.js"))
@Html.Script(Url.WidgetContent("client-components/selectors/common/sf-list-selector.js"))
@Html.Script(Url.WidgetContent("client-components/selectors/media/sf-media-service.js"))
@Html.Script(Url.WidgetContent("client-components/selectors/media/sf-media-filter.js"))
@Html.Script(Url.WidgetContent("client-components/fields/image-field/sf-image-field.js"))
@Html.Script(Url.WidgetContent("client-components/selectors/media/sf-image-selector.js"))
DesignerView.PropertyGrid.json
In the same folder create a file named 'DesignerView.PropertyGrid.json' and add the following JSON.
{
  "components": [ "sf-image-field"]
}
grid-designer.js
Make a copy of the grid-designer JavaScript at /ResourcePackages/{your package}/Mvc/Scripts/Designer/grid-designer.js. At the start of the file find the 'gridDesignerModule' and add some extra modules. (sfSelectors, sfFields, ngSanitize) These will display and open the image selector.
// custom
var gridDesignerModule = angular.module('gridDesigner', ['pageEditorServices', 'modalDialog', 'serverDataModule', 'sfSelectors', 'sfFields', 'ngSanitize']);
// end of custom
You will notice I have a little 'onclick' method on the button in the razor file. This is a little function to help hide or show the image selector to help keep things clear. Nothing too important but helpful if you have and show multiple selectors. Add this function to the end of the grid-designer file.
function showImageSelector(el) {
    var selector = $(el).attr('id');
    $("#div-" + selector).toggle();
    $("#tmb-" + selector).toggle();
    var text = $("#txt-" + selector).text();
    $("#txt-" + selector).text(
        text == "Show" ? "Hide" : "Show");
}
page-editor-services.js
Next is the page-editor-services JavaScript file. Place this in the root of your Sitefinity WebApp at /Designers/Scripts/page-editor-services.js. Around line 260 you want to add two new properties which will hold the image URL and image id properties. We only really need the image URL but I added the id just in case. In case of what...? I don't know, just in case.
var gridElement = function (id, name, css, label, isPlaceholder,
    selectedImageUrl, selectedImageId) {  //custom
    this.id = id;
    this.name = name;
    this.css = css;
    this.label = label;
    this.isPlaceholder = isPlaceholder;
    this.selectedImageId = selectedImageId; // custom
    this.selectedImageUrl = selectedImageUrl; // custom
};
Then around line 273, we again want to reference our new properties. Notice here is where it is looping through all the data-sf-elements attributes.
var getInnerElements = function (layoutRoot) {
    var gridElements = [];
    var elements = $(layoutRoot).findExcludeNested('[data-sf-element]');

    //Sort out the inner columns
    for (var i = 0; i < elements.length; i++) {
        var element = elements[i];
        var id = $(element).attr('id');
        var classValue = $(element).attr('class');
        var displayClass = classValue.replace('sf_colsIn', '').trim();
        var columnName = $(element).attr('data-sf-element');
        var label = $(element).attr('data-placeholder-label');
        var isPlaceholder = $(element).hasClass('sf_colsIn');
        var selectedImageUrl = element.style.backgroundImage; // custom
        var selectedImageId = $(element).attr('data-sf-image-id'); // custom

        gridElements.push(new gridElement(id, columnName, displayClass, label, isPlaceholder,
            selectedImageUrl, selectedImageId)); // custom
    }

    return gridElements;
};
Next under the 'constructLayoutHtml' method, we need to add
var css = elements[i].isPlaceholder ? 'sf_colsIn ' + elements[i].css : elements[i].css;
$(innerDiv).attr('class', css.trim());

//custom
if (elements[i].selectedImage) {
    var selectedImage = 'url(\'' + elements[i].selectedImage.MediaUrl + '\')';
    $(innerDiv).css('background-image', selectedImage);
    $(innerDiv).attr('data-sf-image-id', elements[i].selectedImageId);

    var selectedImageUrl = 'url(\'' + elements[i].selectedImage.MediaUrl + '\')';
    $(innerDiv).attr({ style: "background-image: " + selectedImageUrl });

}
// end of custom code

$(innerDiv).removeAttr('id');
Finally one more under the 'refreshContainer' method.
if (label) {
    $(innerDiv).attr('data-placeholder-label', label);
}
else {
    $(innerDiv).removeAttr('data-placeholder-label');
}

// custom code
if (elements[i].selectedImage) {
    var selectedImageUrl = 'url(\'' + elements[i].selectedImage.MediaUrl + '\')';
    $(innerDiv).attr({ style: "background-image: " + selectedImageUrl });

    $(innerDiv).attr('data-sf-image-id', elements[i].selectedImageId);

}
// end of custom code
sf-service.js
Our last script is the sf-service JavaScript file. Place this in the root of the project at /client-components/selectors/common/sf-services.js. Near the end under the 'constructContext' variable add the below.
getUICulture: function () {

    // custom code
    if ($injector.has('gridContext')) {
        return null;
    }
    // end of custom code

    if ($injector.has('widgetContext')) {
        return $injector.get('widgetContext').culture;
    }

    return customContext && customContext.uiCulture;
},
And Done
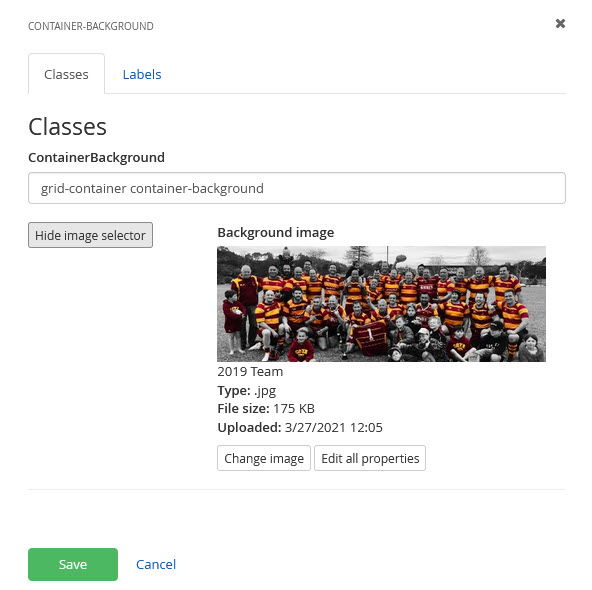
With all this in place, when you drag your layout widget onto teh page and open its designer you should see an option to select an image.
This is really helpful functionality in my opinion. I would like to see Sitefinity create a better developer experience to implement this. Overriding their files like this is not ideal especially when it can break in future updates.
PS: Can you spot me in that picture of 'athletes'?

Thanks for reading and feel free to comment - Darrin Robertson
If I was really helpful and you would buy me a coffee if you could, yay! You can.
Leave a comment Load more commentsMake a Comment