Setup
& Settings
When the module is installed there are a few settings you should configure as well as putting the core and call back widgets onto your pages.
Snipcart
Commerce
Documentation
- Introduction
- Snipcart commerce
- Product management
- Snipcarts dynamic module or Sitefinity's eCommerce module
- Product variations and form fields
- Adding variation and form fields to product items
- Settings & Setup
- Configuration requirements
- Installation
- Installing the NuGet package
- Orders
- Receiving order information in Sitefinity and associating it with your users.
With your Snipcart account set up, you will need to get hold of your API keys. There is a public key used to identify you and drive the cart. This is visible on the web page. Then there is a private key which is used server-side to make calls and validate requests to your callbacks that they are in fact valid Snipcart POST's.
These should be entered into the Snipcart configuration node found under Settings -> Advanced.
As a suggestion you can use the Sitefinity external source config to set these values in your web.config. Most deployment processes cater easily for editing appSettings values. This will help, especially keep your Snipcart private key out of source control.<add key="sf-env:snipCartConfig:PublicApiKey" value="{your key}"/>
Web Security
If you have the web security module installed or are using a Content Security Policy, you will need to add several entries to allow Snipcart to function. Add *.snipcart.com to your script, style, image-source, connect-source and child-source lists.
Add the Core Widget
The core widget adds the Snipcart script, styles and container element. This will be required on any page you want cart functionality. The most obvious place for this will be your base page and place it as far to the bottom of the page as you can.
Opening the cart
It is very common to want to have a button to open the user's current cart as well as display the current number of item in the cart.

You can achieve this by adding some of Snipcarts classes to your elements. The snipcart-checkout class will open the cart when clicked and the count and price classes will place those values inside the corresponding element they are assigned to.
<button class="snipcart-checkout">
    <span class="snipcart-items-count"></span>
    <span class="snipcart-total-price"></span>
</button>
The Callback Widget
The call back widget is required if you wish to receive notifications back from Snipcart and to validate your user's carts. The widget itself has no render-able views and I would suggest you create a dummy page using the empty bootstrap layout and drop the widget into this.
BUT! You can not name this page Snipcart or have any other page (or more importantly URL) be '/snipcart/'. This is because the routes start with this name and page routes will take precedence over these routes. I did think about creating actual Web API calls but then this may have caused clashes with your existing calls... maybe.
The widget will register 5 API's.
[HttpGet]
[Route("snipcart/payment-validations")]

[HttpGet]
[Route("snipcart/sf-payment-validations")]

[HttpGet]
[Route("snipcart/payment-validation/{id}/{name}/{paymentInCents}")]

[HttpGet]
[Route("snipcart/webhook")]

[HttpGet]
[Route("snipcart/sf-profile/get-user")]
Payment Validations
When Snipcart looks to process a users cart it first needs to validate that the submitted cart values have not been tampered with and make a callback to your site to check product prices. This API lists all your products and the data required by Snipcart to validate them. If things match then Snipcart will proceed with the purchase.
The sf-payment-validations is used when you are using data from the Sitefinity eCommerce module.
Payment
Any purchase requires Snipcart to validate but the issue with a donation or payment is that the user decides on the price. This API actually receives the amount in the request and then generates the validation data for Snipcart.
When someone is giving you money why reject it? But do think about this for your scenario.
Webhook
If you wish order data to be pushed back into Sitefinity from Snipcart then this API will be called. Currently, it reacts to one event, order completed. It takes that data and updates the orders table.
Profile
If you wish to allow signed-in users from your site make purchases and have them assigned to orders posted back then this API will query your site and get user data. Profile data is only returned for signed-in users.
Development
One issue you will need to deal with is when testing in your development environment. Snipcart needs to make a call back to your site to validate the purchase. This means your site needs to be accessible via the public internet.
To accomplish you can use a proxy service. One such is ngrok. You can sign up and use it for free.
When you run it, it will set up a connection and listener service to ngrok and ngrok will create a custom URL that will forward requests to your local listener which will forward them onto your local website and you can do your testing.
Very Quickly
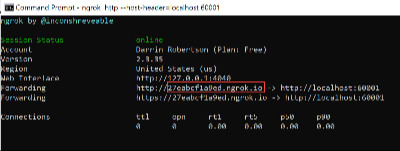
After you install the ngrok you run it in a command prompt with the command 'ngrok HTTP localhost 8080. If that does not work you may need to add --host-header=localhost after the protocol.
This will fire up and present you a screen with your new custom URL.
Copy this URL and go to your Snipcart dashboard. Update the 'webhook' domain name and the allowed domains and subdomains entry.
Next in your Snipcart settings, you need to update the DomainUrl with this entry as well.
Restart your site and you can now test away.
When you are finished and closeout ngrok the next time you start you will have a brand new URL to use so you will need to repeat these steps each time. If you wish for a permanent URL you will need to go onto one of ngrok's payment plans.
Also, don't forget to set things back if you need to after testing.